In my previous post, I explained how I went about selecting the Keter Bellevue shed from Costco. I plan on having this post plus one more in this category. This post will be about how I built the foundation for the shed. I was actually dreading the construction of the foundation far more than I was concerned about building the shed. I’d read over and over and over again that the foundation must be absolutely level. If the foundation isn’t level, then the rest of the shed won’t go together properly. The common problems reported (with both this shed and the Rubbermaid Big Max and probably true of most vinyl sheds) are that the roof can’t be attached properly and that the doors won’t line up.
As the ground area wasn’t level where I planned to build the shed, I was definitely worried. I tried to look up online different suggestions on how to build the foundation and I found many, many different suggestions. With some of the ideas, it almost seemed like it would have been easier to pour a concrete slab. I knew I wasn’t going that far.

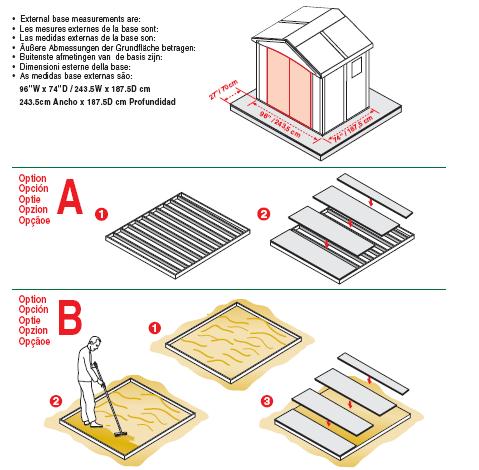
Looking at the instructions for the Keter Bellevue Shed (linked as they are available online in pdf), they give two suggestions for how to build a foundation. While the instructions were very clear with the general construction of the shed, the part on the foundation was not entirely clear, specifically with the dimensions. The manual lists the external base measurements as 96″ x 74″ and then they say the shed should be kept 27 ” away from any fence or wall until fully assembled. In the images of the foundation from the manual, they make it appear you need to have 27″ of foundation space on EACH side. This would leave a significant amount of space around the shed on the foundation. It didn’t make sense to me, and I decided to take a chance and only build the foundation leaving only 3-6″ of extra space on each side. I did have the thought of leaving the foundation about 2 feet away from the nearest fence, leaving space between the fence and the back of the shed. It turns out the reason you need the space is to put a ladder or large step stool next to the shed for placing the screws into the roof. In the end, I wasn’t able to reach the very highest screws with my normal sized step stool, but the 2 feet of space between the foundation and the fence was barely enough to get to all of the other screws.
My suggestion when placing the foundation is to leave at least the 27″ they recommend to place a ladder or large step-stool to reach the top of the shed for the screws. You don’t need to have this extra space available on the foundation, as the picture suggests.
As to the actual construction of the foundation, looking at the manual, the two suggested methods appear to be A) building a frame out of 2×4’s or similar with numerous 2×4’s across. Then cover the top with some type of wood sheets. The other method would be to just build an outer frame of 2×4’s without the middle support bars but instead fill in the center of the frame with the dirt, and then cover the top with the wood sheets.
 I decided to go somewhere in between. I first created a rough sketch of my own idea of using 2×6’s for the frame, wanting the final frame to be 8′ 6″ across and 6′ 6″ wide. I went to Home Depot and found someone who was actually reasonably helpful and told him what my plan was. I found treated 2×6’s that would be find to sit on the ground all year round. I had them cut 2 boards for the ends that are 6′ 6″. They then cut 4 boards that were 8′ 6″. I had them cut 1/2 inch weather treated plywood sheeting into 6′ 6″ width slabs, and in my only error, I got enough to cover 8′ 6″ worth of distance. I didn’t take into account the extra 4″ of space that the 2×6 boards took on the end. It wasn’t that big of a deal as the sheeting was supported by the cross beams throughout. I didn’t use as many cross beams as are pictured in the manual, but I felt that was overkill. The total cost of the frame materials (wood plus screws) was around $80.
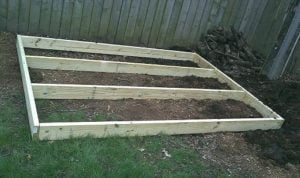
One of the most difficult parts of the process was trying to level the ground. I first constructed the above frame, using long wood screws to hold the boards together. You can see the image above of the frame. I then took it to the place where I wanted to place the shed and started digging. I dug under the parts where the frame sits and kept checking with my level. It took a lot of digging, checking, and moving dirt around. As the frame is not entirely rigid, parts of it would seem level and other parts were not. Eventually I got it almost completely level. No matter where I put the level, the bubble was at least on one of the lines if not completely between them. I realized that the dirt I had dug up and moved around was going to settle over time. I tried to compact it as much as possible, but I know that over time the ground will settle. Hopefully the ground will settle evenly under the shed.

After I had the frame level and in the proper place, I covered the frame with treated 1/2″ plywood sheets that were pre-cut to the correct width at Home Depot. I used the wood screws to secure the sheeting to the frame. The picture on the left shows the completed foundation with the shed’s vinyl flooring pieces on top.
In the end, the shed went together much more easily than I expected (I’ll review the construction it in my next blog entry). The roof went on without much of a struggle and the doors lined up well enough to work properly, although they aren’t perfect (maybe a few millimeters difference at the top – but close enough that the doors close properly and the sliding lock lines up properly). The shed seems great and I’ll post more pictures and a review of the Keter Bellevue shed in my next blog entry in this category.
This is really a great information for the people who are looking for building a shed .Thanks for sharing keep on updating guys.
Thanks for the post. I was confused about sizing the base. I thought it might have to be exactly the dimensions of the shed floor. 6” all around will work great for me. Cheers