As I mentioned in my posts about sunflowers and my one month raspberry update, rabbits are a big problem in my yard. My kids love them and my dog hardly notices them, but I hate what they do to the vegetation in our yard. After the second time one of my raspberry plants was destroyed, I figured I had to something or else most of my plants would probably not survive.
I looked into a variety of options including growing repellent plants like marigolds nearby (takes effort and time and may not work). I also read about other repellents, but it seems you need to reapply after every rain and they may not work. I strongly considered the motion sensitive sprinklers, but reviews suggest they probably aren’t sensitive enough to detect rabbits (but they seem to do very well for larger animals like repelling dogs and deer).
Ultimately I decided to go the chicken wire route. I went to my local home Depot and found many varieties of rolled chicken wire. There was this nice looking green plastic mesh which was cheap, but reviews suggest that rabbits can and do easily eat their way through the plastic.
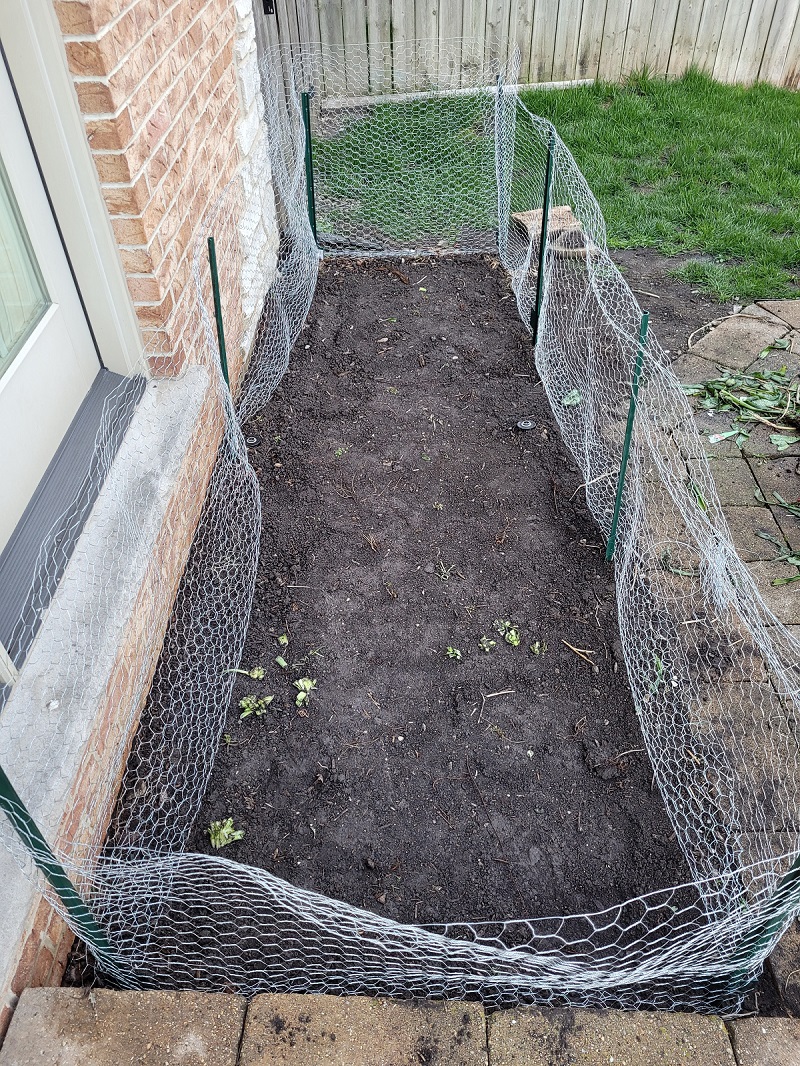
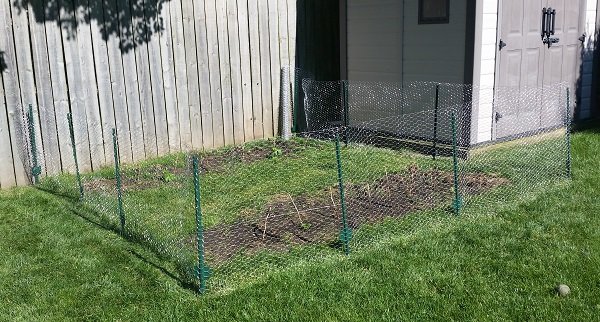
I decided on the metal chicken wire with one inch spaces. My raspberry plants are grown in an area bordered by a fence on one side, a shed on another, and then two open sides. The fenced side should be pretty safe from rabbits, although they can dig underneath it. The shed side isn’t rabbit proof, so I’d need to basically chicken wire three sides of a square – about 12 feet on each side. One 50 foot roll cost around $17. Instead of going with wooden stake supports that I’d done in the past, I decided on metal supports which cost about 1.70 each. I bought 10 of those, so each of the three sides would have four posts (corners count twice!). I was going to use some twist ties to attach the chicken wire to the posts, but wound up using the metal wire that is used to hold the chicken wire in the roll. The wire was surprisingly easy to use – I just needed a wire stripper/cutter to clip off a few inches and then the wire functioned essentially like a twist tie. I also bought these small metal anchors to hold the bottom of the chicken wire to the ground. It was a few dollars for a pack that had around 20. All in, the materials were under $40.
I got everything home and first hammered the posts into the ground. I probably have about six inches into the ground, roughly spacing them 3-4 feet apart each:
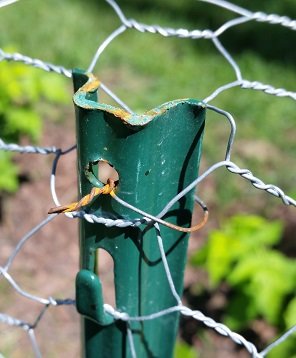
 Unwrapping the chicken wire was the hardest part of a relatively simple process. The roll of chicken wire was held together with this thin wire that I had to unwrap before I could unroll the chicken wire. As I said about, I used this thin wire, cut into pieces, as twist ties to hold the chicken wire to the posts. The posts had holes in them at the top, middle, and bottom, so I fastened the fencing at least at the top and bottom, and at all three spots on the corner posts.
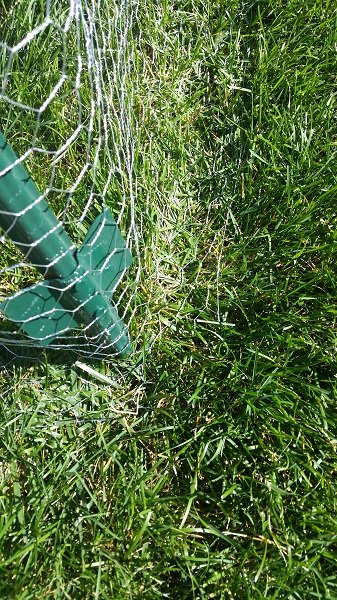
I unrolled the fencing and then starting at one corner near the fence, unraveled the fencing, having the natural bend towards the inside – essentially unrolling it against the bend around the corners. It maybe doesn’t make much difference, but I figured I could make it a little snugger this way. I decided in advance that I was NOT going to bury the chicken wire. This was a chance I decided to take as I thought it would be a huge amount of extra effort to bury the wire and I wasn’t sure if the rabbits eating my plants would go through the effort to dig under the wire. What I did instead was have the chicken wire bend at the bottom along the ground, with about 6 inches of fencing along the ground. I then placed anchors about every 3 feet to hold the chicken wire against the ground. There would be no way to fit under the chicken wire without digging a tunnel at least several inches long. At least that is what I was hoping. Rabbits apparently can be very persistent but I figured if they wanted to get to my raspberries, they could also dig a hole under the wooden fence – that isn’t buried into the ground either.
Overall, I would say it took me about 90 minutes to do the entire project by myself. Much of the time was spent unraveling the chicken wire. Hammering in the posts only took 15 minutes or so. Fastening the chicken wire to each post took most of the time. I fastened it to each post as I unraveled it, pulling it snug between each post. The posts I bought have little nubs sticking out which made for decent spots to have the fencing fit into when pulling it snug. At the corners, I had to place a cut in the bottom six inches that lies on the ground, allowing it to bend. I placed the fence on June 19th, but I didn’t get around to making the post until July 31st. I realized I didn’t take any pictures of the wire twist ties I made/used or of the six inches of fencing along the ground. I took some pictures today and you can see that the wire twist ties and the top of the posts have rusted. I tried to take a picture of the six inches of fencing along the ground, but the grass has grown over most of it. I pulled out some grass to try to make it more visible. Here’s some photos:

Update July 31st: So far, the fencing has worked great. My calculated risk paid off. I haven’t noticed any animal damage to my raspberries. And there is no sign of any digging trying to get into the fenced in area.
One thing I didn’t plan for was a door to easily get in and out of the fenced in space. I am just tall enough to step over one side of the fence. Obviously I will want my kids to be able to get into the fenced area once we have raspberries as that is a big part of the fun. I may just left them in and out of the space, but I am also considering adding a “door” along the side opposite the shed. I’ve had a few different ideas how I can do it. I’m leaning towards cutting the fencing in the middle of that side and then putting a wooden 1″ x 4″ board into the ground. I can put some sort of nails on the board to act as hooks for the fencing to connect to. I would then pull the fencing off of the nails to get in and out. At this point, there is no reason for a fence. If I do one this fall, or next year, I’ll try to post an update with more pictures.
Update 5/28/2022
One thing I’ve learned and keep getting reminded of regularly, is that I have to protect anything I grow in the ground from animals. I’m not sure whether it is rabbits, or squirrels, or skunks, or chipmunks, or something else that eats all of my plants. But something regularly does if I don’t make a secure cage.
I had tried to make a removable cage out of PVC piping and chicken wire years ago. It was a lot of work and looked pretty good. But it didn’t work. Even the slightest gap between the ground and the PVC pipe / chicken wire would get exploited by animals. And over time, the chicken wire would have small gaps near areas of the PVC pipe that animals would crawl through. Essentially, if there isn’t a perfect sealed perimeter, the plants will vanish.
So I removed the former PVC pipe / chicken wire sectional fences and replaced them with posts and chicken wire. I’ve found that what works well for me is flaring out the bottom of the chicken wire about 3-6 inches and then using garden staples every foot or so to fasten it against the ground. Technically, animals can dig underneath the wire, but I haven’t found that happening when I’ve used this approach. For the corners, I have to make a vertical cut in the bottom of the chicken wire to allow it to bend around the corner. I have to be careful that I don’t make the cut too high or else there could be a gap for animals to enter.
On the other side of the patio, I was able to successfully build a perimeter with the house acting as one side of the rectangle. I couldn’t effectively do that here because of the patio window there. I can’t get the chicken wire to effectively seal against the window, so I had to run chicken wire along the side by the house too. Unfortunately, it looks like I’m going to get weeds back there that will be tough to address.